Note
Go to the end to download the full example code.
Switching from CPU to GPU computation
Learn how to use CPU & GPU backends in your experiments.
CPU & GPU Backends
The PyEPRI package can perform intensive calculations on CPU or GPU using the popular scientific computing libraries in Python: NumPy (CPU), CuPy (GPU), and PyTorch (both CPU & GPU).
To enable the use of those different computation methods in a unified way, PyEPRI introduces a backend system. At the beginning of a script, the user selects a backend and passes it as an argument to PyEPRI functions. The key advantage is that the backend is chosen on a single command line of the script, and the rest of the script runs independently of which backend is used (there is no need to develop a different code for running an experiment using Numpy (CPU), PyTorch (CPU/GPU) or CuPy (GPU)).
Curious users who want to learn more about how the backend system works can take a look at the section below in the tutorial. However, a deep understanding of the backend mechanism is absolutely not required to use PyEPRI.
Finally, if for any reason the user prefers not to use the backend and instead wants to develop scripts that rely directly on the desired library (NumPy, CuPy, or PyTorch) to perform scientific computing operations, this is entirely possible. An example using the PyTorch library is provided in the final section of the tutorial.
Note: the NumPy backend (CPU) is included by default when installing PyEPRI. To use other backends, they must be specified during the installation of PyEPRI (see the Installation page for details).
Check which backend is available on your system
To check if a backend is available on your system, you can try instantiating each one using the following commands. If a command runs without raising an error, the corresponding backend is likely available on your system.
# --------------------- #
# Import needed modules #
# --------------------- #
import pyepri.backends as backends # to instanciate PyEPRI backends

# ---------------------------------------------- #
# Try to instanciate the four available backends #
# ---------------------------------------------- #
backend = backends.create_numpy_backend() # numpy backend (CPU)
backend = backends.create_torch_backend('cpu') # torch-cpu backend (CPU)
backend = backends.create_cupy_backend() # cupy backend (GPU)
backend = backends.create_torch_backend('cuda') # torch-gpu backend (GPU)
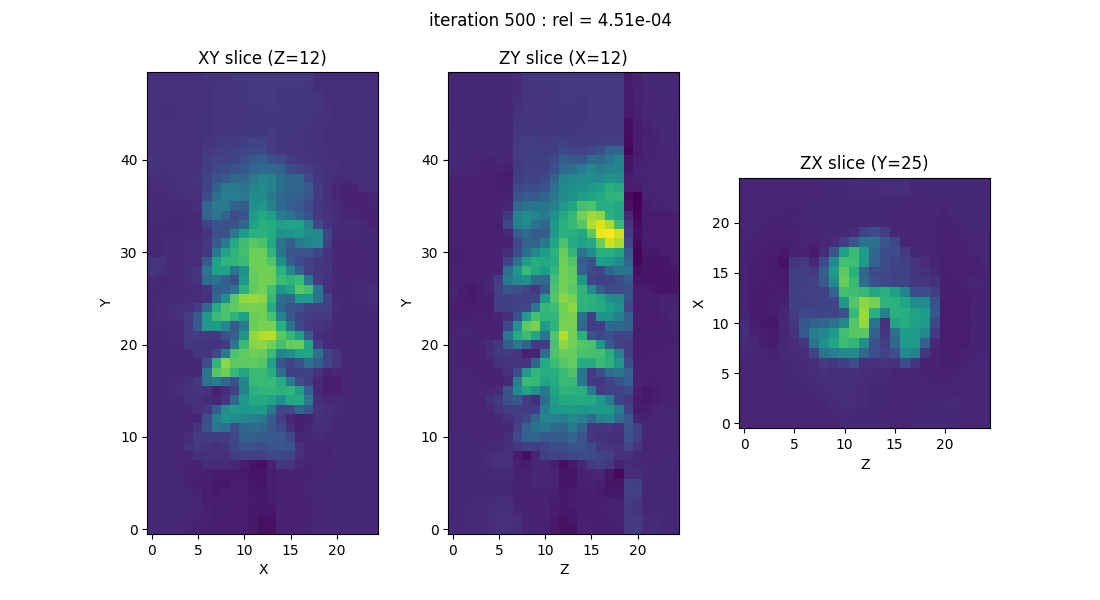
EPR image reconstruction using a (Numpy) CPU backend
Once you’ve checked which backends are available on your system, you can simply choose the one you’d like to use in your experiments. Since the NumPy backend is installed by default, we’ll start by using it to reproduce the simplified RPE image reconstruction experiment introduced in the very first tutorial.
# --------------------- #
# Import needed modules #
# --------------------- #
import pyepri.backends as backends # to instanciate PyEPRI backends
import pyepri.datasets as datasets # to retrieve the path (on your own machine) of the demo dataset
import pyepri.displayers as displayers # tools for displaying images (with update along the computation)
import pyepri.processing as processing # tools for EPR image reconstruction
import pyepri.io as io # tools for loading EPR datasets (in BES3T or Python .PKL format)

# ---------------------------- #
# Create a numpy (CPU) backend #
# ---------------------------- #
backend = backends.create_numpy_backend()

# ----------------------------------------------------------------- #
# Load one demonstration dataset (fusillo pasta soaked with TEMPOL) #
# ----------------------------------------------------------------- #
dtype = 'float32' # use 'float32' for single (32 bit) precision and 'float64' for double (64 bit) precision
path_proj = datasets.get_path('fusillo-20091002-proj.pkl') # or use your own dataset, e.g., path_proj = '~/my_projections.DSC'
path_h = datasets.get_path('fusillo-20091002-h.pkl') # or use your own dataset, e.g., path_h = '~/my_spectrum.DSC'
dataset_proj = io.load(path_proj, backend=backend, dtype=dtype) # load the dataset containing the projections
dataset_h = io.load(path_h, backend=backend, dtype=dtype) # load the dataset containing the reference spectrum
B = dataset_proj['B'] # get B nodes from the loaded dataset
proj = dataset_proj['DAT'] # get projections data from the loaded dataset
fgrad = dataset_proj['FGRAD'] # get field gradient data from the loaded dataset
h = dataset_h['DAT'] # get reference spectrum data from the loaded dataset

# ----------------------------------------------------- #
# Configure and run TV-regularized image reconstruction #
# ----------------------------------------------------- #
delta = .1; # sampling step in the same length unit as the provided field gradient coordinates (here cm)
out_shape = (50, 25, 25) # output image shape (number of pixels along each axis)
lbda = 500. # regularity parameter (arbitrary unit)
displayer = displayers.create_3d_displayer(nsrc=1, figsize=(11., 6.), display_labels=True)
out = processing.tv_monosrc(proj, B, fgrad, delta, h, lbda, out_shape, backend=backend,
                            init=None, tol=1e-4, nitermax=500, eval_energy=False,
                            verbose=False, video=True, Ndisplay=20, displayer=displayer)

EPR image reconstruction using a (Pytorch) GPU backend
Now, let us reproduce the same experiment using another backend (here a PyTorch GPU backend, but you can select another one, depending on the backend availability on your system).
Note: the use of a GPU backend instead of a CPU one should lead to a faster computation, however, the speed-up factor will depend on you hardware configuration (CPU & GPU).
# --------------------- #
# Import needed modules #
# --------------------- #
import pyepri.backends as backends # to instanciate PyEPRI backends
import pyepri.datasets as datasets # to retrieve the path (on your own machine) of the demo dataset
import pyepri.displayers as displayers # tools for displaying images (with update along the computation)
import pyepri.processing as processing # tools for EPR image reconstruction
import pyepri.io as io # tools for loading EPR datasets (in BES3T or Python .PKL format)

# ------------------------ #
# Select a PyEPRI backend  #
# ------------------------ #
#backend = backends.create_numpy_backend() # uncomment here for a numpy backend (CPU)
#backend = backends.create_torch_backend('cpu') # uncomment here for torch-cpu backend (CPU)
#backend = backends.create_cupy_backend() # uncomment here for cupy backend (GPU)
backend = backends.create_torch_backend('cuda') # uncomment here for torch-gpu backend (GPU)

# ----------------------------------------------------------------- #
# Load one demonstration dataset (fusillo pasta soaked with TEMPOL) #
# ----------------------------------------------------------------- #
dtype = 'float32' # use 'float32' for single (32 bit) precision and 'float64' for double (64 bit) precision
path_proj = datasets.get_path('fusillo-20091002-proj.pkl') # or use your own dataset, e.g., path_proj = '~/my_projections.DSC'
path_h = datasets.get_path('fusillo-20091002-h.pkl') # or use your own dataset, e.g., path_h = '~/my_spectrum.DSC'
dataset_proj = io.load(path_proj, backend=backend, dtype=dtype) # load the dataset containing the projections
dataset_h = io.load(path_h, backend=backend, dtype=dtype) # load the dataset containing the reference spectrum
B = dataset_proj['B'] # get B nodes from the loaded dataset
proj = dataset_proj['DAT'] # get projections data from the loaded dataset
fgrad = dataset_proj['FGRAD'] # get field gradient data from the loaded dataset
h = dataset_h['DAT'] # get reference spectrum data from the loaded dataset

# ----------------------------------------------------- #
# Configure and run TV-regularized image reconstruction #
# ----------------------------------------------------- #
delta = .1; # sampling step in the same length unit as the provided field gradient coordinates (here cm)
out_shape = (50, 25, 25) # output image shape (number of pixels along each axis)
lbda = 500. # regularity parameter (arbitrary unit)
displayer = displayers.create_3d_displayer(nsrc=1, figsize=(11., 6.), display_labels=True)
out = processing.tv_monosrc(proj, B, fgrad, delta, h, lbda, out_shape, backend=backend,
                            init=None, tol=1e-4, nitermax=500, eval_energy=False,
                            verbose=False, video=True, Ndisplay=20, displayer=displayer)
What is a PyEPRI backend and what is it designed for?
PyEPRI was designed in a modular fashion. The functions of this
package rely on standard datatypes (mostly arrays) and not on
specific classes. The only nonstandard object involved in this
package is a backend system whose role is to facilitate CPU & GPU
compatible scripting and development. More precisely, the PyEPRI
backend system allows the use of the libraries {numpy, cupy,
torch} in a unified framework.
Although most common functions of the numpy libraries are usually
also available in the cupy, and torch libraries, those
functions rely on library-dependent types (e.g., numpy.ndarray,
cupy.ndarray, torch.Tensor, …) and library-dependent
datatypes (e.g., numpy.float32, cupy.float32,
torch.float32, …). Besides, parameter naming conventions or default
values oftenly differ between those libraries. The role of the backend
is to remap those library-dependent types, datatypes and common
functions towards a standardized counterpart (examples are provided
below).
Technically, a PyEPRI backend is an instance of the
pyepri.backends.Backend class and must be passed as input of
most functions of this package. It is also recommended to prefer the
usage of the backend commands (e.g., backend.abs,
backend.meshgrid, backend.rand, …) to their
library-dependent counterparts in your own script. Doing so, moving
from a CPU based computation framework with numpy to a GPU based
computation framework with cupy or PyTorch is possible by simply
changing the backend instance (keeping the rest of the script
unchanged) as we systematically do in all provided EPR imaging demo
examples.
Remark: The available backend functions (backend.abs,
backend.meshgrid, backend.rand, …) have been restricted to
the functions needed in the internal submodules and in the tutorial
and example scripts. The backend functionalities may be extended in
future releases of the PyEPRI package, depending on the needs.
Building a script without relying on the backend
If for any particular reason you prefer to avoid using the PyEPRI backends in your scripts, you can simply choose the scientific computing library you wish to work with (in the following example, we use PyTorch) and ensure that you manually use the appropriate functions to handle the resulting arrays (Tensors in the case of PyTorch).
Note: to run the following commands, the PyEPRI PyTorch extension must be installed (see the installation section).
# --------------------- #
# Import needed modules #
# --------------------- #
import torch # PyTorch library for tensor operations
import pyepri.datasets as datasets # to retrieve the path (on your own machine) of the demo dataset
import pyepri.displayers as displayers # tools for displaying images (with update along the computation)
import pyepri.processing as processing # tools for EPR image reconstruction
import pyepri.io as io # tools for loading EPR datasets (in BES3T or Python .PKL format)

# ----------------------------------------------------------------- #
# Load one demonstration dataset (fusillo pasta soaked with TEMPOL) #
# ----------------------------------------------------------------- #

# set paths & load datasets (without specified backend, the data are loaded as Numpy arrays)
dtype = 'float32' # use 'float32' for single (32 bit) precision and 'float64' for double (64 bit) precision
path_proj = datasets.get_path('fusillo-20091002-proj.pkl') # or use your own dataset, e.g., path_proj = '~/my_projections.DSC'
path_h = datasets.get_path('fusillo-20091002-h.pkl') # or use your own dataset, e.g., path_h = '~/my_spectrum.DSC'
dataset_proj = io.load(path_proj, dtype=dtype) # load the dataset containing the projections
dataset_h = io.load(path_h, dtype=dtype) # load the dataset containing the reference spectrum

# extract and convert to PyTorch Tensor the loaded (Numpy) arrays
device = 'cpu' # PyTorch device parameter (use 'cpu' to store Tensors on the CPU or 'cuda' to store Tensors on GPU)
B = torch.from_numpy(dataset_proj['B']).to(device) # get B nodes from the loaded dataset (handle numpy.array --> torch.Tensor conversion)
proj = torch.from_numpy(dataset_proj['DAT']).to(device) # get projections data from the loaded dataset (handle numpy.array --> torch.Tensor conversion)
fgrad = torch.from_numpy(dataset_proj['FGRAD']).to(device) # get field gradient data from the loaded dataset (handle numpy.array --> torch.Tensor conversion)
h = torch.from_numpy(dataset_h['DAT']).to(device) # get reference spectrum data from the loaded dataset (handle numpy.array --> torch.Tensor conversion)

# ----------------------------------------------------- #
# Configure and run TV-regularized image reconstruction #
# ----------------------------------------------------- #
delta = .1; # sampling step in the same length unit as the provided field gradient coordinates (here cm)
out_shape = (50, 25, 25) # output image shape (number of pixels along each axis)
lbda = 500. # regularity parameter (arbitrary unit)
displayer = displayers.create_3d_displayer(nsrc=1, figsize=(11., 6.), display_labels=True)
out = processing.tv_monosrc(proj, B, fgrad, delta, h, lbda, out_shape, init=None,
                            tol=1e-4, nitermax=500, eval_energy=False, verbose=False,
                            video=True, Ndisplay=20, displayer=displayer)

# ------------------------------------------------------ #
# Check output type and perform a simple post-processing #
# operation (compute output integral)                    #
# ------------------------------------------------------ #
print(f"type(out) = {type(out)}") # you should get torch.Tensor here
print(f"output integral = {torch.sum(out * delta**3)}") # this is a library-dependent operation (torch.sum only works for PyTorch arrays)

type(out) = <class 'torch.Tensor'>
output integral = 0.8972424864768982
As we can see, writing a library-dependent script is entirely possible. This is one of PyEPRI’s strengths: its functions rely only on standard data types. PyEPRI does not introduce any custom classes that users would need to learn to instantiate or manipulate. Users can simply work with their preferred scientific computing library (NumPy, CuPy, or PyTorch) without any additional abstraction layer.
In the example above, the data is loaded as PyTorch tensors, and the returned data is of the same type. The script remains very similar to the previous ones and never relies on a PyEPRI backend. However, if the user decides to switch to a different library (for example, using NumPy or CuPy instead of PyTorch) to perform the same image reconstruction experiment, the script will need to be modified in several places—especially in more complex cases involving display functions or array manipulation operations.
Total running time of the script: (0 minutes 8.043 seconds)
Estimated memory usage: 1193 MB